Several years ago, I decided to embark on a homesteading program in an effort to become healthier, more self-sufficient, and ultimately organic. While these are all noble ideals, the reality was more difficult to face. Over time, the neighborhood raccoon managed to pick off my chickens one-by-one, until they were all gone. The squash bugs demolished my squash plants year after year. The squirrels and birds took most of my fruits. Yet the one thing that has persisted is my hive of bees.
Keeping bees wasn’t easy right away either. The first year I ordered bees, I had started too late. By the time I got my first package of bees, it was already June. In Texas where I live, it is already hot and dry by June. My poor bees had missed the Spring feeding frenzy and did not have enough time to build their comb and store enough food for that winter. They did not make it. The second year I tried again and I made sure to start early. That time I got my package of bees in early March.
Getting started is actually easier than you might think, and just takes a few steps. First, build your own top-bar bee hive with a few simple tools. Then, order the bees and a queen online and install them in their new home. Finally, wait a year, and you can harvest your first batch of raw, organic honey.
Build Your Own Hive
There is definitely an initial “ick” factor when you first start handling bees, but once you get over that, there is concern about how much it costs to start with a modern bee hive, and getting all the equipment to go with it. For a backyard hobbyist such as myself, however, you don’t have to get all the latest modern equipment. In fact, you can build your own hive with a pallet and basic wood working tools.
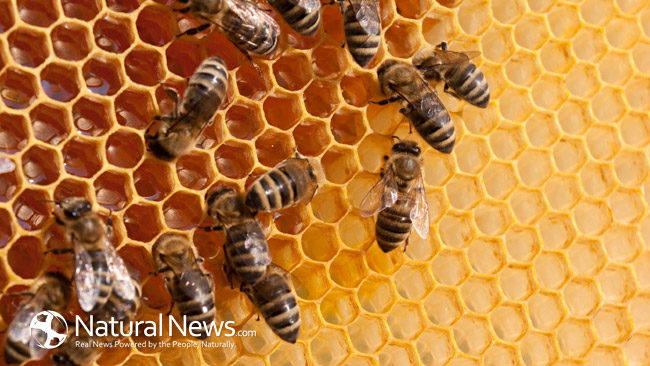
The top-bar hive is used in many parts of the world, and some would argue, is more natural for the bees. It consists of a V-shaped long box with a number of wooden bars set on top of it, where the bees will build their combs on. I found a wooden pallet that I took apart and used for the wood, so it did not cost me any money. All I had to buy were a few wooden dowels, and some wood glue.
The PDF on the first link below has excellent step-by-step instructions for building your own top-bar bee hive, with plenty of photographs and illustrations. Once I finished building it, I placed it in my yard away from where my kids would be playing and other foot traffic, but where it would be protected from the Northern winds and the brutal sun.
Order Your Bees
It seems strange, but yes, you can order a package of bees, or a “nuc”, online, and they’ll be delivered to you via the US Post Office! When my bees were delivered, my mail carrier refused to touch the box the bees came in and had me go out to her truck to pick up the bee package in a white USPS carrier. When you order your bees, be sure to include a queen as well. Professional bee keepers are able to split hives and reproduce queens, and will ship them to you by USPS. The workers bees have to acclimate to their new “queen”, which is why the queen is kept in a separate container at first.
There are many companies that sell nucs and queen packages online. The second site listed below lists a few of them. A package with a queen will generally cost around $125, plus S&H. This is by far the most expensive part of starting a bee hive. Be sure to put in your order early in the spring, or late winter, because believe it or not, they do sell out! Don’t make the same mistake I made the first time, and wait until Spring is over to get your bees. It has to be above freezing for the bees to survive shipping, but you don’t want it to be too warm when you get them either.
The package will come with instructions on how to “install” the bees, and slowly release the queen. When you “install” the bees, you don’t need any special equipment. I’ve used a plastic bottle sprayer to spray the bees with some sugar water, before opening their crate, and that has worked really well. The bees become subdued and docile. A few may immediately fly out, but they’ll leave you alone and eventually make their way back to the hive. The rest of the bees will stay clumped together, and will want to stay near the queen.
Harvest Your Honey
After you’ve installed your bees and the queen in your home-made top-bar hive, cover it up, and watch them go! They will need to start building comb for the queen to start laying her eggs, and then get busy gathering pollen and making honey. They will have a lot of work to do! The first year you do not want to harvest any honey from them, as they will need everything they have to make it through their first winter. If they survive their first winter, then you know they have become established and will be around for a long time.
A year after they’ve settled in, you can start harvesting honey from your top-bar hive! The best time to harvest the honey is March-April, as this will give the bees enough time to stock up again for the following winter. Then the following Spring you can take what is left, and so on. The final link at the bottom gives some helpful tips on harvesting your honey.
Keeping Bees is Worth It
It’s fun watching your bees build up their hive. You can see them flying in and out all throughout the day when it is warm, and when it gets too hot, they congregate outside to cool off. Unless their hive is threatened after they have become established, they will leave people alone and mind their own business. Not only that, but if you have fruit trees or a vegetable garden, they are a wonderful way to pollinate your fruits and vegetables. Now my family enjoys seeing them around the yard, collecting pollen from all the flowers outside. Plus, we enjoy getting raw organic honey from our own backyard.
http://www.beginningbeekeeping.com/How_to_build_a_top_bar_hive.pdf
https://www.thespruce.com/honey-bees-for-your-small-farm-3016543
https://www.hobbyfarms.com/how-to-harvest-honey/


